FAMILY... FOOD... & FRIENDS
add a bottle of wine to that & I'm
in heaven!

Thursday, July 2, 2015

Bubbles & Fries

I must admit it... my guilty pleasure is a bottle of Veuve Clicquot Champagne paired with McDonald's french fries. Don't judge me until you've tried it! The pairing is sublime. In fact there are many things besides strawberries that pair nicely with champagne. But how often do we keep the real stuff in our fridge? In fact the top shelf of my wine fridge is filled with sparkling wines from the Finger Lakes, which is one of the reasons I'm here in New York to learn wine making, and the sparkling wine from Spain known as cava.

We often use the word champagne to describe any brut or blanc de blancs from anywhere, but actually, only sparkling wines that come from the Champagne region in France own the rights to use that name with few exceptions (those that have been grandfathered in such as two of our own Finger Lakes sparkling, New York's Great Western Champagne and Dr. Frank's Champagne). Not having the right to use the title champagne does not necessarily mean it's any less quality. True champagne can only be made from a combination of three grapes, Chardonnay, Pinot Noir, and Pinot Meunier. The finest champagnes also employ the "methode Champenoise," or as those of us outside the region of Champagne, the "traditional Method" which means among other things that the sparkles are made from a secondary fermentation inside the bottle. Don't be fooled by the method of carbonating still wine, that leads to clunky bubbles like soda pop rather than effervescence that tickle your nose.

Cava happens to be an incredibly inexpensive alternative to champagne. It uses a few different varieties of grapes other than Chardonnay such as the Spanish varieties of Macabeo, Parellada, and Xarel-lo, but it still uses the traditional method. This makes a great week night sparkle on its own or a less expensive ingredient to add to dishes & other cocktails (or for the drive thru at McDonalds).


So here is a super easy and quick dessert to do with a bottle of sparkling wine from Spain or right around the corner in the Finger Lakes... Cantaloupe Sorbet.

If you have an ice cream maker, this couldn't be easier. If you don't have an ice cream maker, this is one reason to get one.


Simply cut up a fresh melon, peeled and seeded.


Throw it in a blender with the juice from 1 lime, 1/2 a cup of sugar, a pinch of salt and a splash of your favorite sparkling wine...


& blend!
This should first be chilled and then churned in your ice cream maker, and that's it!


In champagne coupe, I float a scoop of sorbet in my sparkling wine of choice with a chiffonade of fresh mint. An amazingly light and fresh dessert, or did someone say breakfast?

Or if you want to skip the whole freezing churning part how about our favorite summertime cocktail (ok we have it in the winter too, especially when grapefruits are in season!)

THE GEMINI!

I like to use fresh squeezed grapefruit because I love the chunks of pulp, I almost trick myself into it being healthier. Anyhow, it's as simple as counting backwards so you can make it for a single cocktail or a pitcher for friends...

4 parts grapefruit juice
3 parts vodka
2 parts St. Germain
1 splash of cava on top of each cocktail
finish with a twist of the grapefruit rind


I guarantee this will be your next favorite cocktail, but be careful or they will make you fall down... or as my sister says, "I'll just sit in the grass and drink them!"


Sunday, February 15, 2015

Fried Rice


As I sit bracing for winter to drop sub-degree temperatures on me yet again, I find myself dreaming of warmer days when I lived in sunny Southern California. There are so many things I miss about my time there, not the least being amazing home delivered take-out. Don't get me wrong, I appreciate the occasional pizza man every now and then, but gone are the days of home delivered sushi or burrito bowls, warm Cubanos or spicy curries & samosas. Since I refuse to open my backdoor and step out into this seasonal tundra I am resigned to what is in my naked refrigerator. Thank goodness for my memory of many Benihanna evenings & too much leftover plain rice. I had my dinner solution.  This is a comfort food that I ALWAYS have the ingredients for on hand & I encourage you to add them to your pantries.
When I cook rice I always make too much... on purpose! If not for fried rice then for Armenian Mint Yogurt Soup, mmmm... that's a good staple one that I have most of the ingredients for too. This dish is a great way to use up leftovers. I laugh thinking of all the times we made this & making sure that we had enough of it to make even more leftovers. I makes next week's lunch perfect. Believe it or not fried rice works better with day old rice. It holds its shape better and forms a better "socarrat," you know, that crunchy caramelized tasty rice that forms on the bottom of the pan... I'll fight you for it. In my freezer I always have frozen vegetables, they're super cheap & they were flash frozen at the peak of ripeness along with all their vitamins & minerals. Next time you're at  the store grab a bag of peas & carrots for 99¢ (it's a good one for chicken potpie too).
 I also always have canned Chinese vegetables in my pantry. They don't go bad & sometimes I just open them & snack on them right out of the can. I would have also used canned mushrooms but I had a bag of fresh ones that needed to used from my vegetable drawer. Onions, garlic & eggs are just everyday staples in my kitchen along with soy sauce & sesame oil. 

 The great thing about fried rice is it can be made with anything you have on hand. No peas & carrots, how about frozen broccoli? Have left over steak or a bag of frozen shrimp? More important than the ingredients is how they are cooked... quick & in layers.  I always start with the eggs because I like my eggs bright yellow & fluffy & definitely not over cooked. This way I take them right out of the wok & put them aside.

Everything after that gets put into the wok in a layered fashion so that flavors can build on each other & more delicate ingredients are left to the end to preserve color and texture.
 onions with a touch of oil are quickly cooked until translucent
mushrooms are added & allowed to brown
meats are added to the wok (trust me if I had a pork chop, steak, or shrimp in my freezer that too would have been sliced up & added to the wok) & pushed up the sides after they cook through
 canned vegetables are added and heated with additional oil as needed
rice is finally added
 This is heated through & allowing our crispy rice on the bottom to form
Finally add frozen vegetables to heat through. Season with soy sauce & taste for balance
 Hot sauce & more soy sauce can be altered for individual taste.
Raise it up for Benihanna & fried rice... who needs delivery?


Thursday, June 26, 2014

Sweet Potato Tots with a Lime Mustard Dipping Sauce

It seems like a very long time ago that I had my first freshly made Sweet Potato Tater Tots.  It was at the Tripel in Playa Del Rey. Top Chef finalist Chef Brooke Williamson made them & my taste buds fell in love.  I may have had them at every visit since.  But I left the west coast beach state & moved east to a country side of lakes & docks.  With my taste buds' memory fading, those sweet potato tots were becoming a simple romantic craving.  I remember the sweetness, the crunch, the steamy fluffy center... A treat I needed to have again.


 As far as the sweet potatoes weigh in, they are incredibly healthy.  I tried to keep it that way.  I experimented with healthy ways such as eggs being the binder & baked with a panko crumbs for the crust as opposed to frying the tots in oil.  I baked the potatoes whole.  I tried shredding the flesh before a quick par-boil.  I may not remember the Tripel's Tots exactly, but I remembered how I wiped a bit of drool from the corner of mouth every time I put in my order... & this wasn't it.  So I went old school & did them as simple as possible.  Tater Tots need to be created from a tiny dice of potato.  They also need to be crispy on the outside & fluffy on the inside.  The Tater Tots more mature & popular brother, the French Fry, taught me a few things about cooking potatoes.  To get a crunchy french fry you need to cook it twice; once at a lower temperature & then fried at a higher temp to crisp things up.  Baking would dry the potato out too much & boiling the potato after it was cut would add too much water to the mix. 


I decided to boil the potato whole until al dante.  Starting in cold salty water...


I left it to boil until still firm in the center but easily stabbed; about 6 minutes. 


When the potato has cooled, it can be easily peeled & chopped. 


The food processor makes exactly the texture I'm looking for with only a dozen quick pulses.


Now with the texture & first cook done, I needed to season & bind this dice together to form a tot.  I tried different spices but all competed with the sweetness of the potato.  Keeping it simple with the tot was important to be able to add flavor packed condiments.


Flour to bind, fresh cracked pepper for spice, & enough salt to bring out the flavors.


Mix until combined.


I used a 1/3 of a cup of flour & a bit more than a 1/4 tsp black pepper, & salt to taste per potato.


I made bit size logs plenty big enough to dip but small enough to match the shape & size of my childhood memories.  I found that keeping my hands damp the same way I do for meatballs help the logs take shape.


I opt for a deep frier so I don't have to regulate the temperature of a spitting oil bath.  With the temperature set at a stable 350º F, these golden tots will be crunchy golden on the outside & hot & fluffy on the inside.  Sprinkle with a bit of flake salt.


These I happened to serve with a delicious Lime Mustard Dipping Sauce that was inspired by another great LA restaurant, Son of a Gun, but a bit more limey & a bit of fresh dill.

Mix together the following, & adjust to taste:
  • 1/2 cup vegenaise (oh so good! but you can always substitute real mayonaise if you like)
  • 2 Tbl spicy brown mustard (with horseradish if you like a bit more kick)
  • the juice from 1 lime
  • 1 tsp honey
  • 1 tsp palm sugar (brown sugar will work great too)
  • 1/2 tsp English mustard powder
  • 1/2 tsp Worcestershire sauce
  • hot sauce to taste
  • salt
  • fresh dill  (thyme would also work)

Now I'm wondering if they can be frozen & reheated in the oven to have as a traveling appetizer.  Or try it with a sprinkling of truffle salt & a less aggressive dipping sauce.  Either way I now have my fresh Sweet Potato Tater Tot crazing completely fixed! 


Wednesday, April 16, 2014

Italian Easter Pie

Italian Easter Pie!  I have to admit that I am new to this wonderful culinary creation.  Easter was a big family celebration in my ginormous Catholic family but our feast tended towards the Irish/German/Polish cuisine, in fact it still does as I wipe away drool thinking of grilled sauerkraut perogis.

But what's wonderful about this Italian Easter Pie is that it is served at room temperature in customized slices.  A super easy bite from brunch through dinner.  Make ahead dish to allow more time with family & friends enjoying a preassembled lunch.  I got my original inspiration from Cook's Country but then I quickly realized I didn't like a bunch of the ingredients & then others were too hard to find.  I made 2 different varieties, one vegetarian & other for my carnivores.  The beauty is it is totally adaptable to individual tastes.


I am so lucky to have friends with chickens!  Freshly gathered eggs this morning allowed me to make 4 of these pies & all great pie starts with a great crust.  Here is a pictorial presentation of our Italian Easter Pie Dough:


6 Tablespoons of each unsalted butter & shortening give this dough the flakiness & the flavor we crave.


Pie dough is super easy... flour, eggs, salt, fat, & a touch of water!  Super fresh ingredients that are COLD! make the best crusts.  This is why I use my food processor so the warmth of my hands has as little contact with the dough as possible.


I have recently stopped measuring dry ingredients by volume & now prefer to measure it by weight, 15oz of flour or 3 cups.  Not only is it more accurate but it is super easy... especially if you are cooking in large quantities.  I like to have everything prepped before I begin... flour measured & a bit over a teaspoon of salt are pulsed in the processor. 


3 fresh eggs are whisked with 3 Tablespoons of ice cold water.


Our chilled cubes of butter & shortening are added to the food processor & pulsed until small pebbles of flour coated fat are created.


Whisked eggs are added!


This is pulsed until a dough forms.


& my hands are still clean!


or at least they were until now.  Knead the dough until it just forms a ball.  Flaky crust depends on us touching the dough as little as possible so that the fat remains in little tiny floured coated pockets.  So maybe 20 turns on a well floured surface.


This dough is then divided into 2 pieces... the first is roughly 2/3 & the remaining 1/3.  Shape into disks, wrap in plastic, & put in the refrigerator... I like to do this a day ahead & leave it in there over night, but an hour will do. 


The next time you see your dough, you will notice white sesame seed shaped pieces of fat sprinkled throughout your dough... these will eventually become the flakes in the dough.

Now onto your fillings... I did 2


Vegetarian


Carnivorous

But both contained CHEESE!


1pound fresh ricotta


4 ounces Pecorino Romano


2 eggs


1 teaspoon black pepper


fresh parsley


Stir until combined.

Finally what ever ingredients make you happy... this is what I used


fire roasted peppers


trimmed into flat sheets


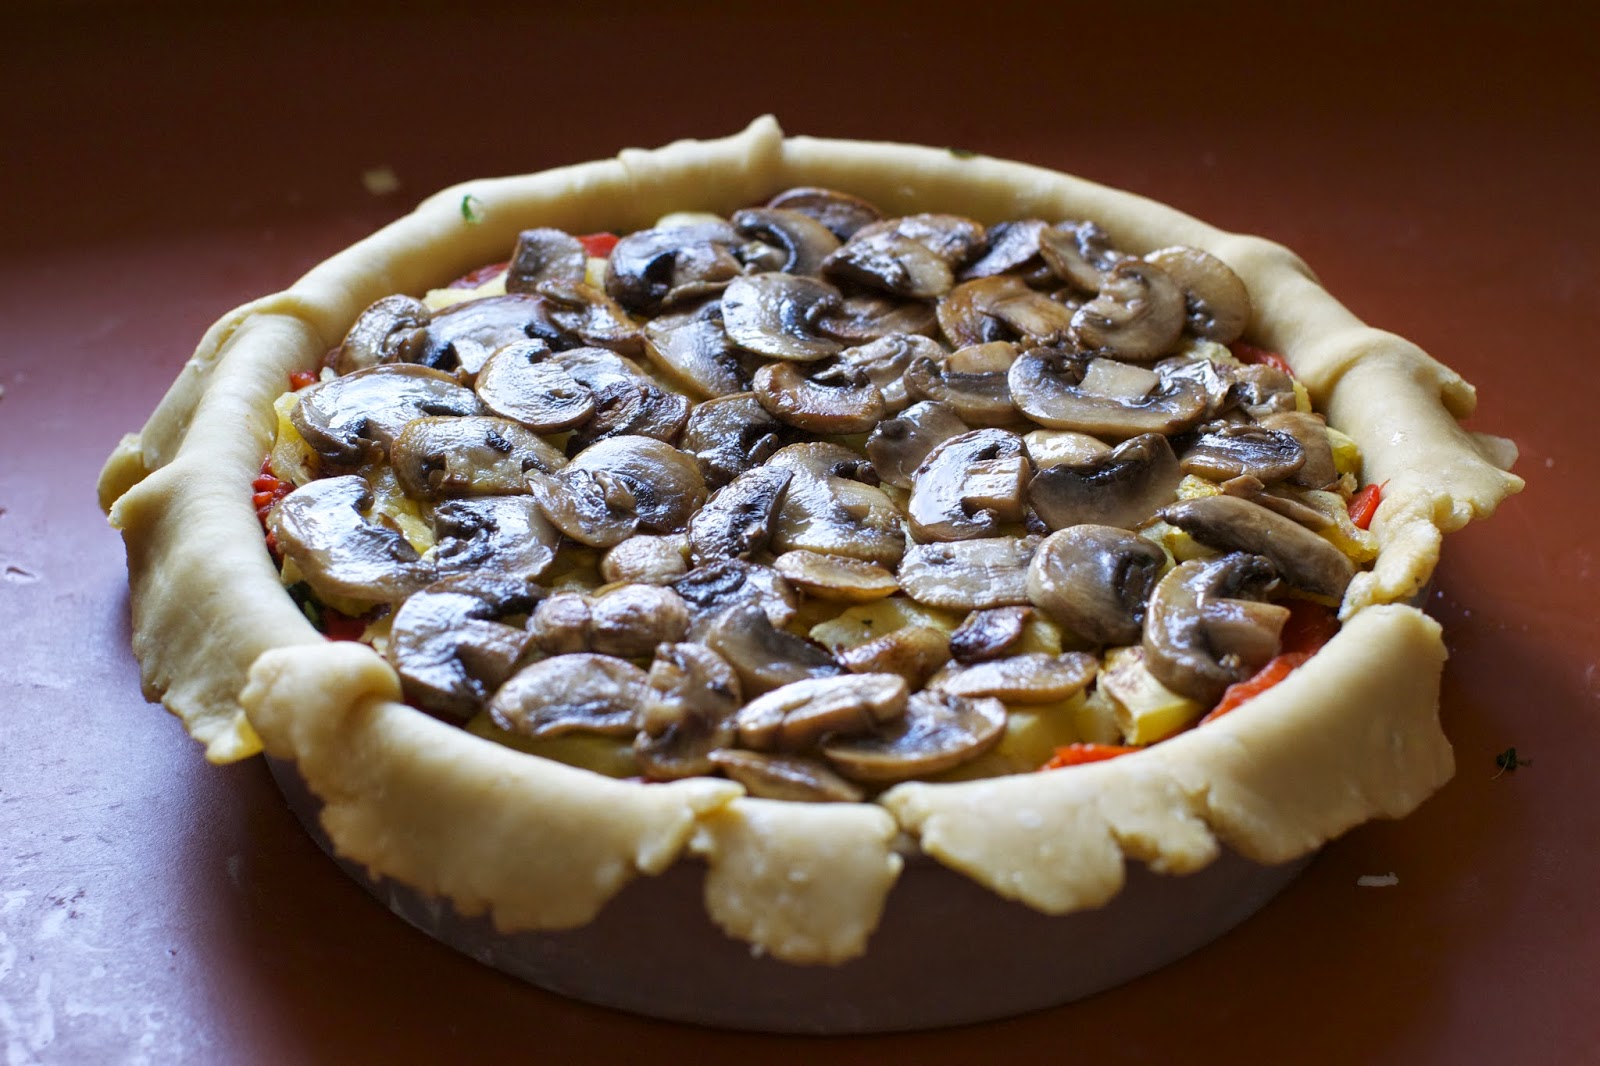
I sautéed mushrooms for the veggie pie.  Make sure you give your fungi enough room in the pan to brown up.  An over crowded pan leads to mushy mushrooms.  


In the same pan I fried up some broccoli, where I later wilted spinach & garlic 


I had an acorn squash so I roasted it up... next time I think I will use butternut simply for the bright orange color to be added to the pie.  Like I said, anything goes.

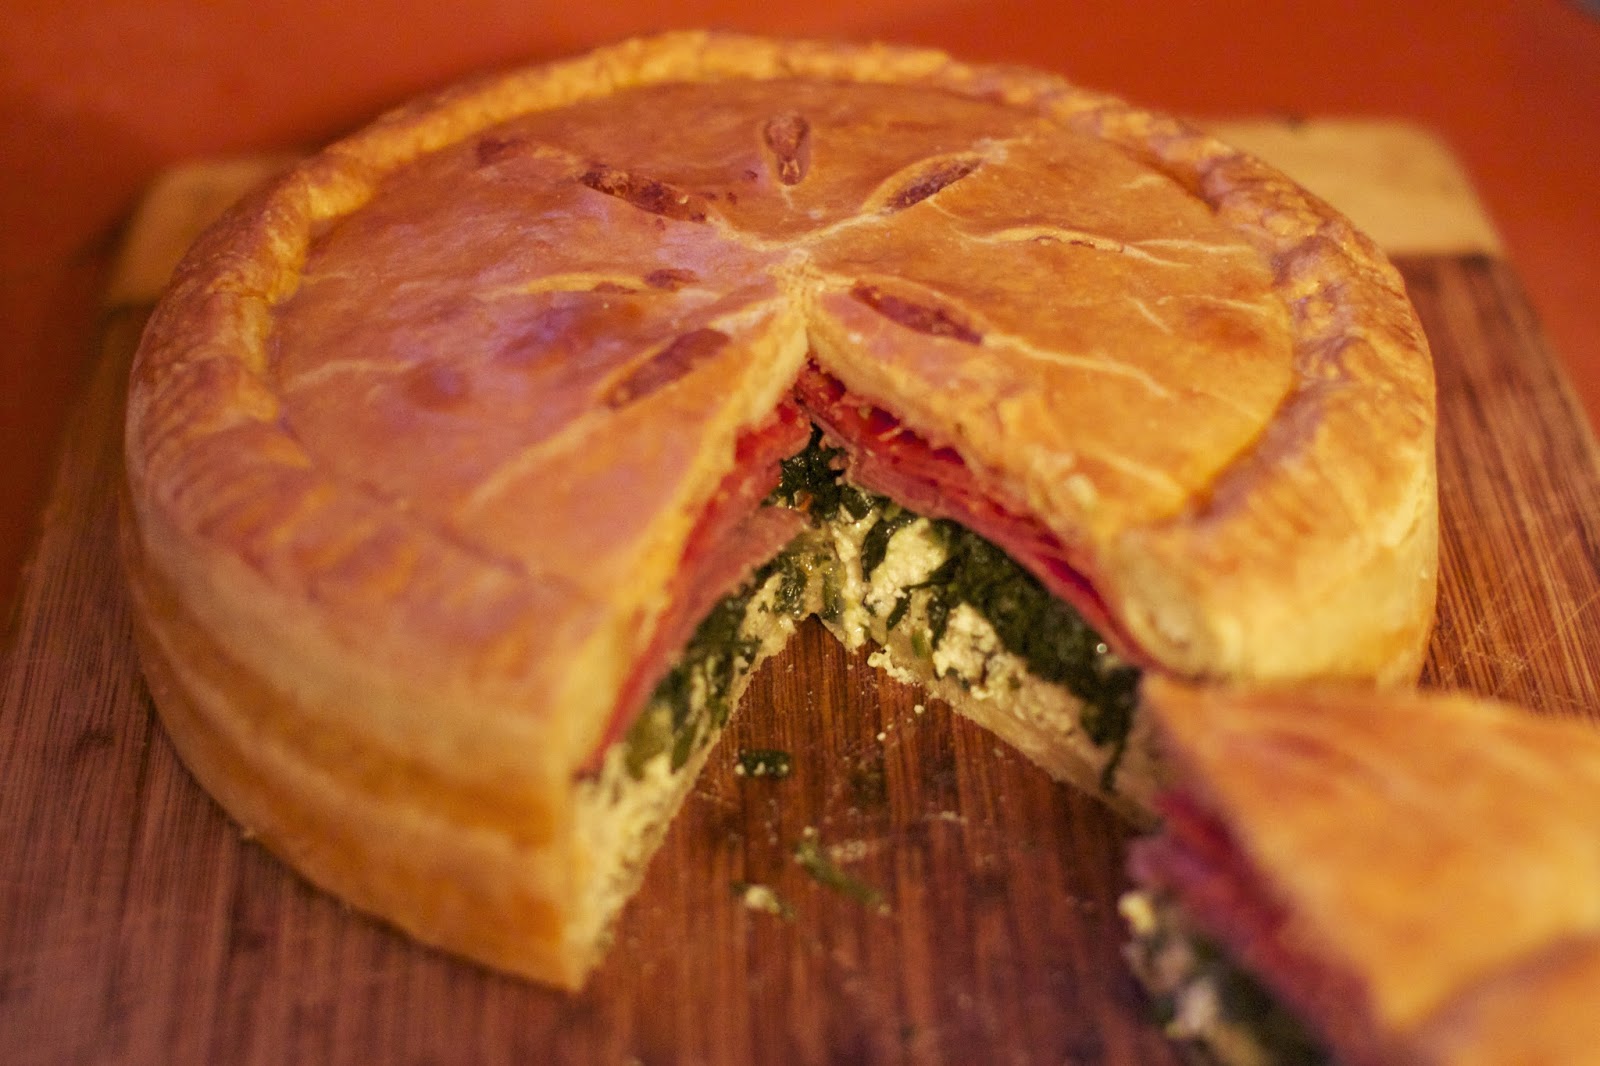
Now the creation process from rolling the dough into a 9" cake pan to shingles of provolone & layered toppings thinking of flavor & what the profile appearance of each wedge is going to look like on a plate.


Here's a variation where I removed the top layers of vegetables & replaced it with meat!


Bake at 375° for 45 minutes & cool for at least 4 hours


Slice & serve!